

SALTWATER SUNRISE LUXURY VILLASAlways 3% discount for direct bookings <br/>look below for promotion codes
Below is a carousel. To go through the images, please swipe left or right, or tap the next and previous buttons.Skip to content

Saltwater Sunrise
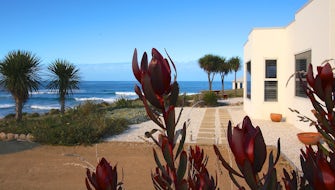
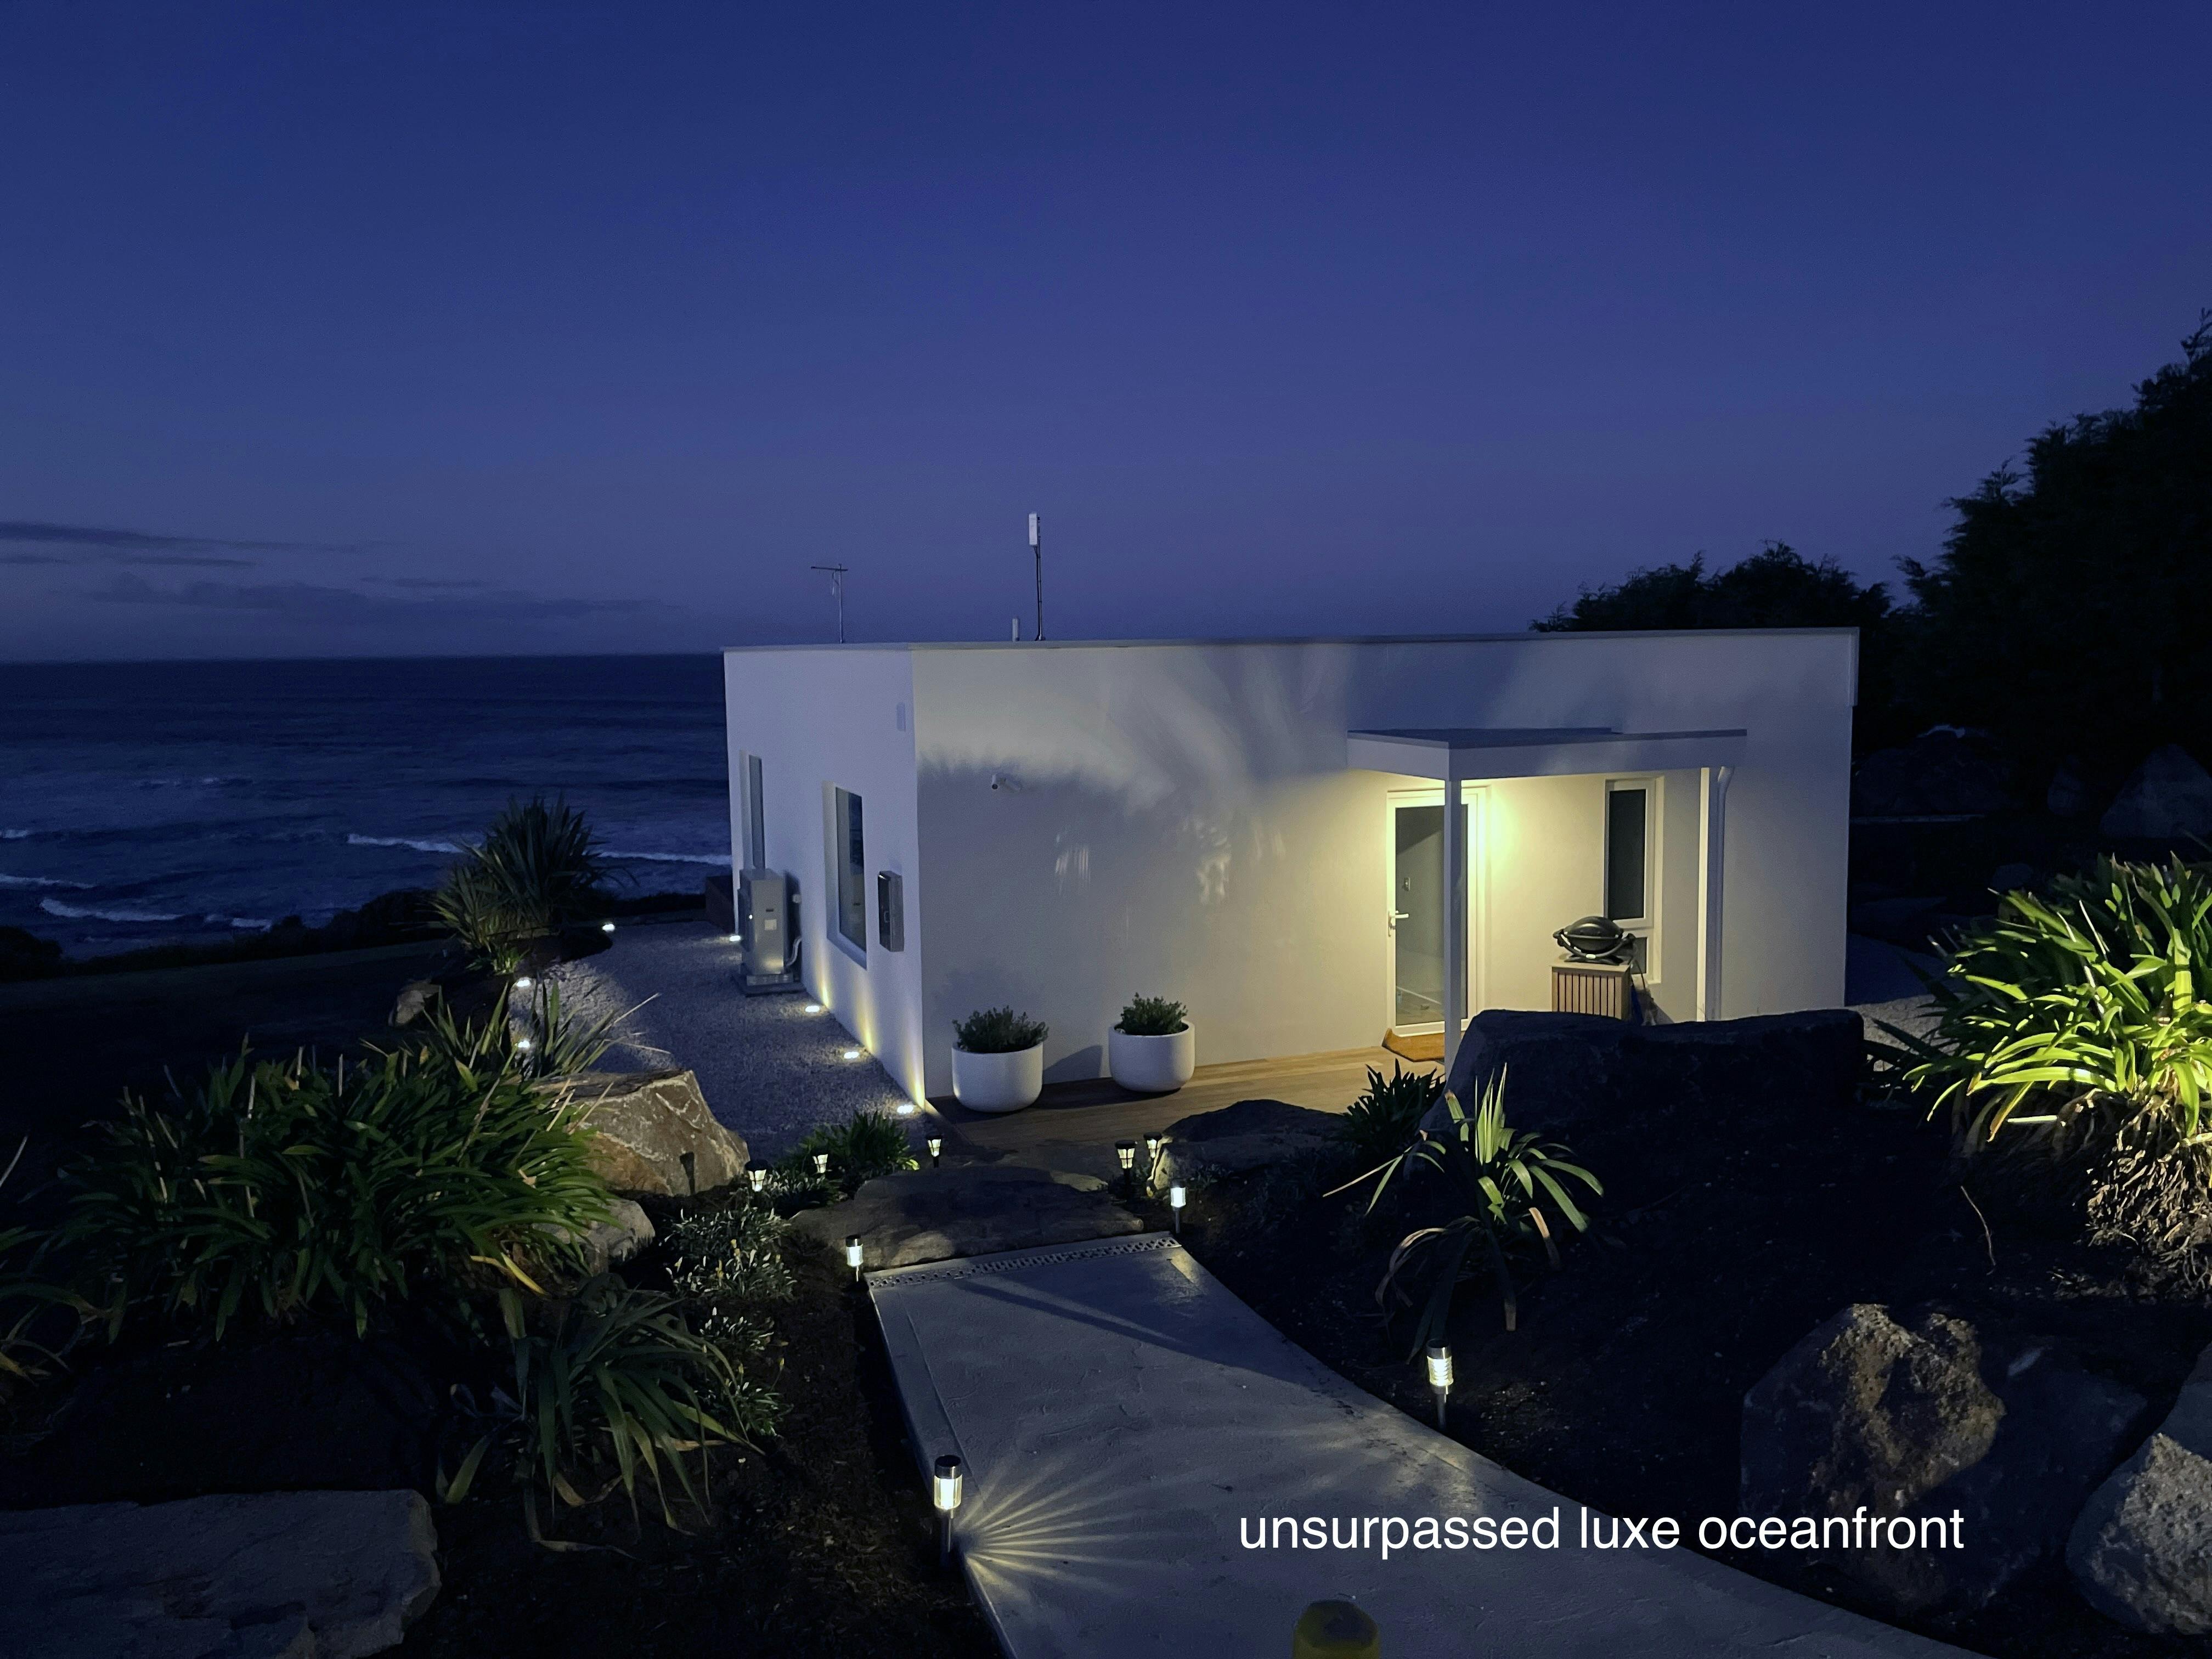
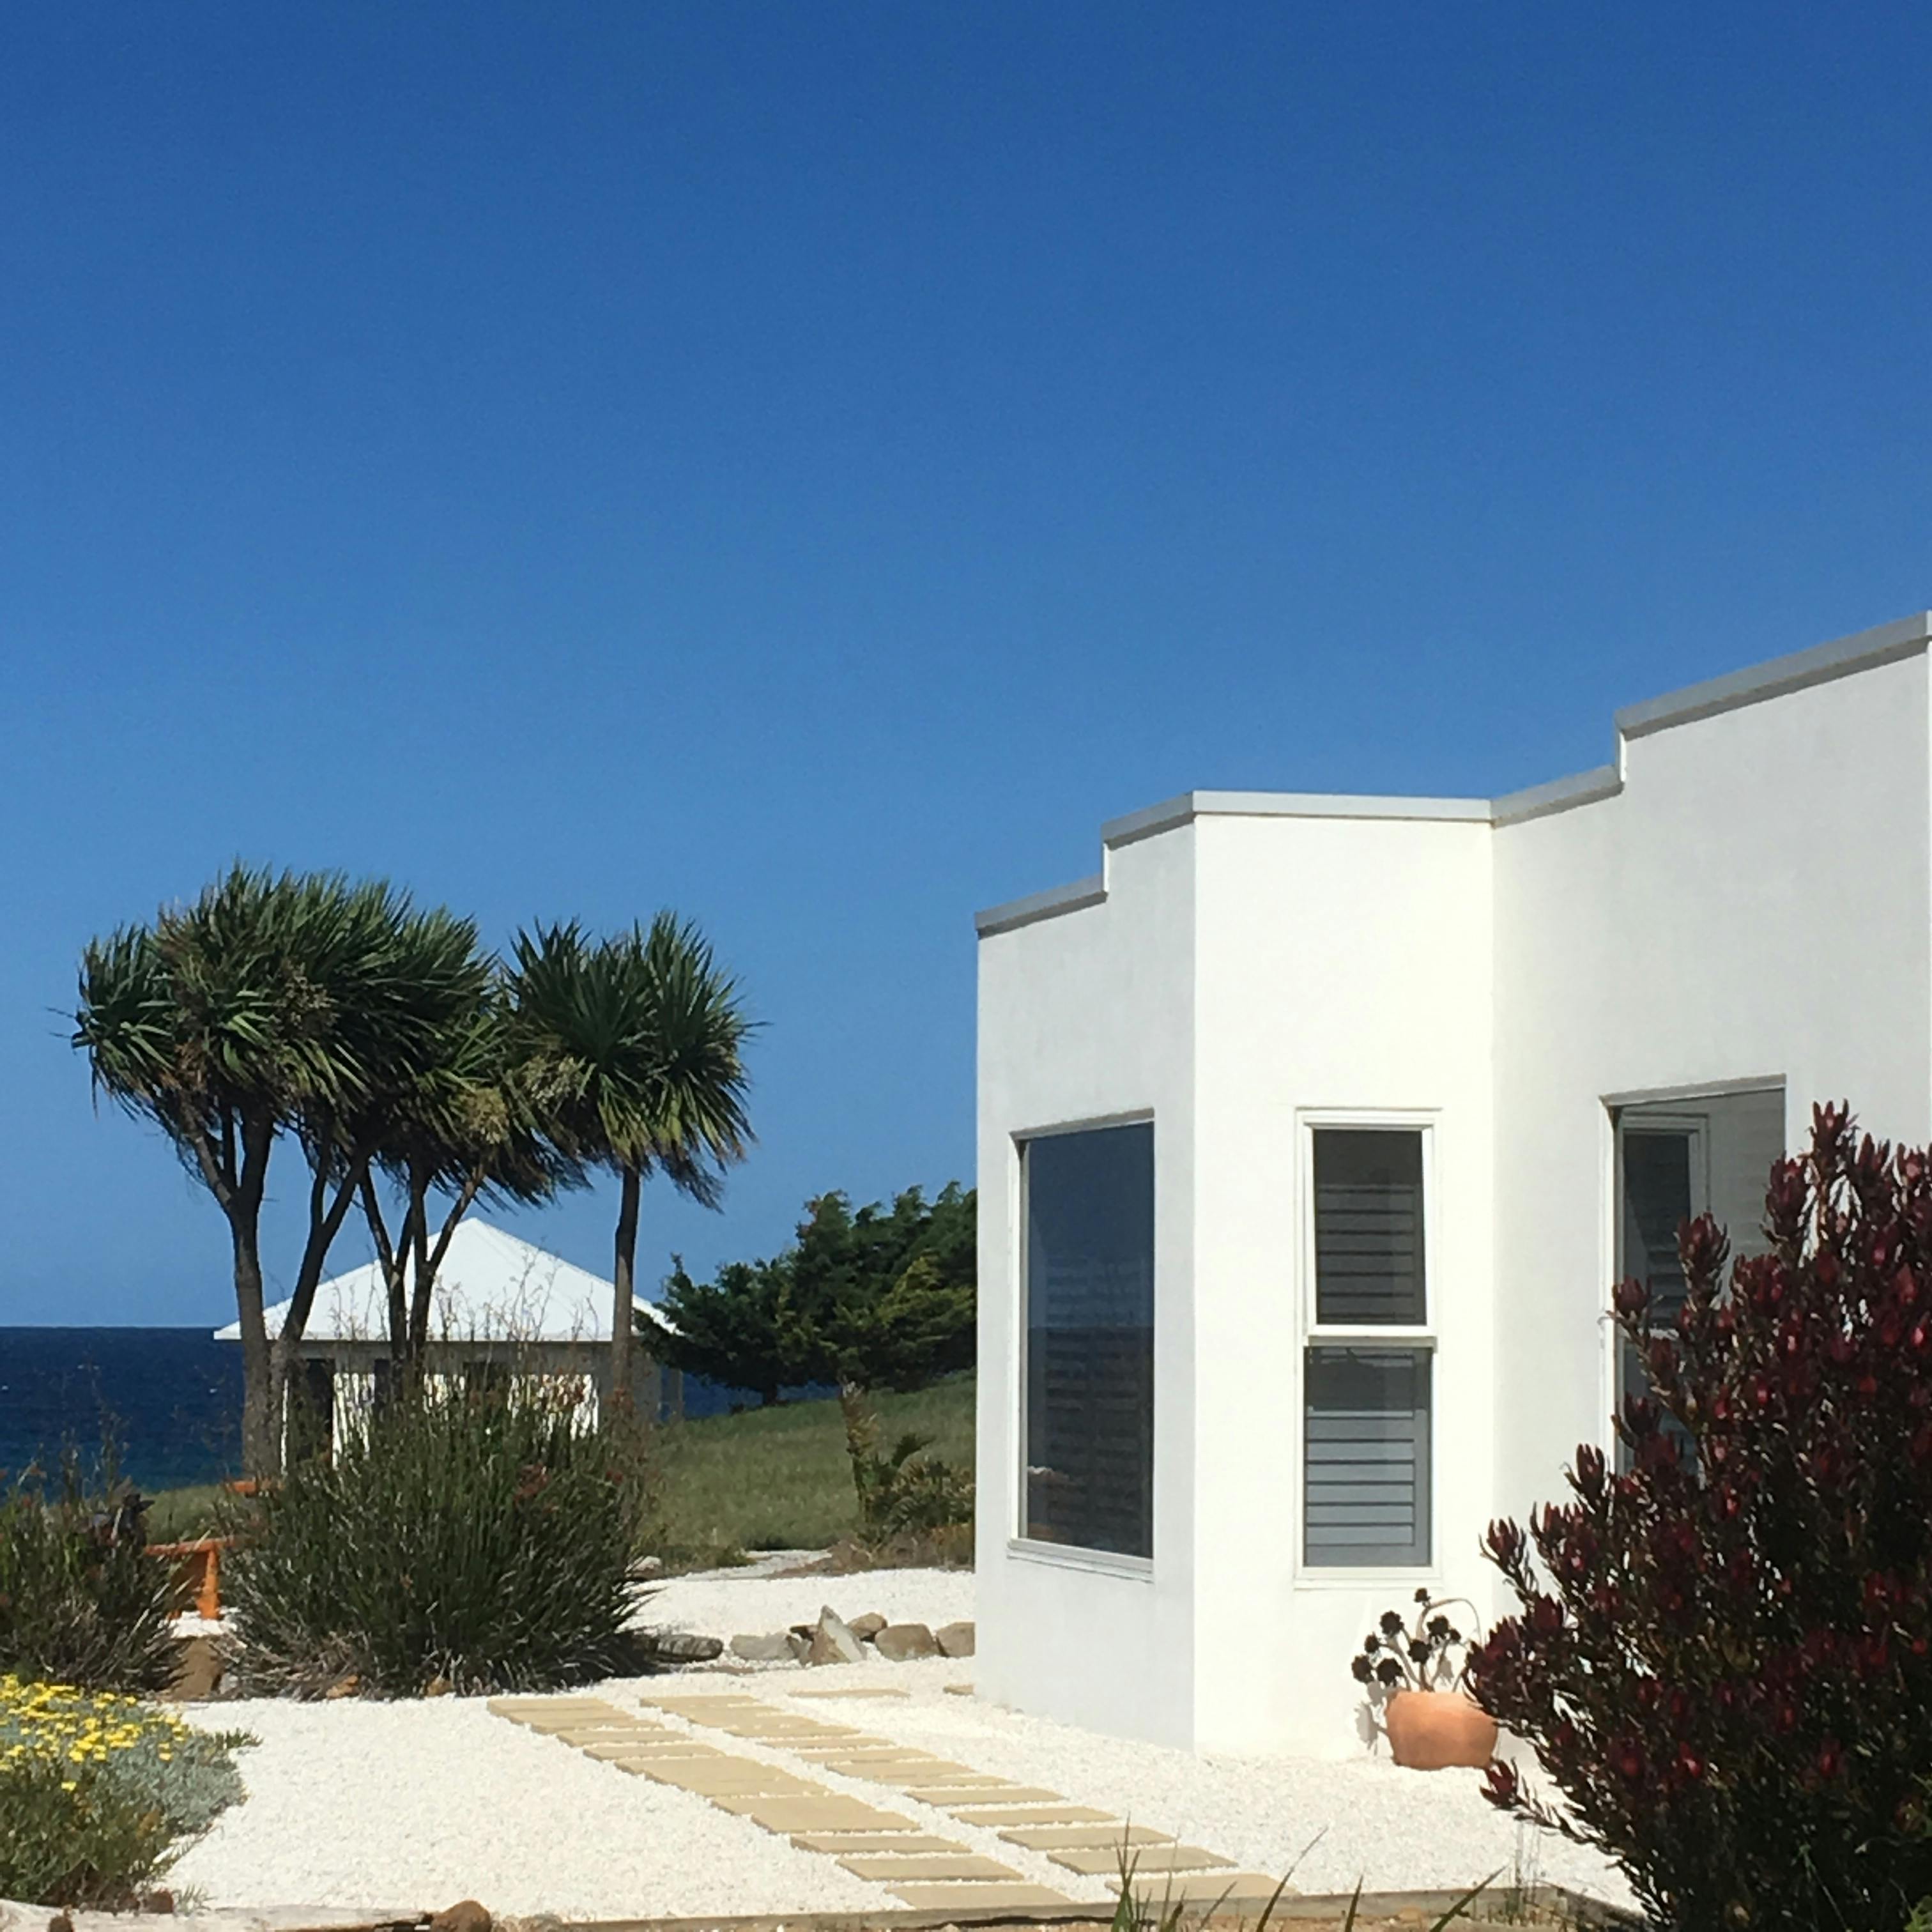
Our absolute Oceanfront Villas are perfect to celebrate special occasions! Secluded, contemporary design, situated between Bay of Fires and Freycinet Wineglass Bay at the East Coast of Tasmania. All villas now feature upgraded comforts designed for every season, eg indoor electric fireplaces and fire pits .
Absolute Waterfront Accommodation
See AllSTANDARD VILLA FOR COUPLE Saltwater is a secluded getaway designed exclusively for couples — a place to pamper yourself, de-stress, or simply relax in luxurious oceanfront surroundings, with complete privacy. Each villa is a tranquil sanctuary where you can unwind, reconnect, and feel totally at ease — with no interruptions during your stay.All our standalone waterfront villas are spaced generously apart (approximately 40 metres between each) and located just 50 metres from the Pacific Ocean, offering stunning, uninterrupted sea views from every angle. Whether you're celebrating a special occasion or simply seeking peace, this is the ideal coastal retreat.Each of our three standard villas is open-plan and of identical high quality, differing only slightly in layout. All include luxurious comforts such as:An indoor mood fireplace for cozy, romantic eveningsA private outdoor fire pit to enjoy under the starsA bluetooth sound system to set the tone of your staySoft candles for ambient lightingClay Pot Water FilterHeating and air conditioning for year-round comfortFrom the moment you arrive, everything is designed to make you feel at ease — effortlessly luxurious, completely private, and endlessly calming.Check-in time is 3:00 PM and check-out is 10:00 AM.LUXURY SPA VILLA with Private Whirlpool & Sauna A time to unwind...Couple’s Coastal Retreat Highlights: Saltwater Sunrise is designed exclusively for couples seeking romance, relaxation, and reconnection. Each standalone villa is just 50 metres from the Pacific Ocean, with a direct path to the shore and panoramic sea views.Villa includes an indoor mood fireplace, outdoor fire pit, built-in sound system, ambient candles, clay pot water filter, and heating & air conditioning for year-round comfort. Note, there is no bath tub in the bathroomCheck-in: 3:00 PM | Check-out: 10:00 AMPrivate Spa Hut (exclusive to your villa): Fully detached and completely private — not shared with other guests. Features a Jacuzzi (heated to 37.5°C), iHealth Infrared Sauna, and private shower.Jacuzzi Experience: Warmed to a soothing 37.5°C, the spa promotes deep relaxation, stress relief, and mental clarity — the perfect place to soak while watching the world go by.Infrared Sauna Benefits: This gentle, dry heat sauna (no steam or rocks) supports detoxification, burns 400–600 calories in 30 minutes, and promotes weight loss, skin elasticity, and improved tone. Infrared saunas are loved globally — from Scandinavia to Japan — for their powerful wellness benefits.SUPERIOR HONEYMOON SPA VILLA with Private Hot Tub and Sauna A time to celebrate.....with breathtaking views over the ocean....An oasis of tranquillity, whether to celebrate an elopement, wedding, honeymoon, baby-moon, anniversary, or a romantic getaway, this superior ultra modern villa has all the perks to make you and your loved one feel special.A private wellness oasis (95m2), including an outdoor heated whirlpool, internal infra-red sauna, electric mood fireplace, soft lighting, and an outdoor fire-pit. Additional features include floor heating, air-conditioning, remote controlled blinds, a Samsung Smart TV and a hyper-boom sound system.Note, there is no bath tub in the bathroom.Outdoor whirlpool/hot tub/jacuzzi and infra-red sauna.......there is nothing better than immersing yourself in the warm bubbling water watching the world go by......you might see whales and dolphinsThe Jacuzzi is heated to 36.5C - provides for a total relaxation experience that relieves stress and evokes a feeling of well-being..Infrared Sauna - one of the most commonly known Infrared Sauna health benefits is the role it plays in detoxification of the body. Regular infrared detox sauna sessions helps to eliminate a wide array of toxins, and in turn, enhances your overall health and wellbeing. Infrared Sauna users in Scandinavia, Japan and indeed all over the world have valued the many and varied health benefits of saunas for generations.Our Infrared Sauna does not steam, has no hot rocks or high heat, but rather emanates a gentle, warm and soothing heat. By spending as little as 30 minutes in the infrared sauna can burn up to 400-600 calories Although water lost through perspiration will usually be replaced by rehydration, the same cannot be said of the calories. This makes sauna use a highly effective weight loss tool By helping to eliminate the toxins that gather directly under the skin, regular sauna sessions can also improve your overall skin tone and elasticity as well as reducing the appearance of cellulite.

Dear Traveller!
Book Direct for the Best Experience at Saltwater Sunrise
We reward our guests who book direct — because we believe your stay should start with something extra:
Price Match Guarantee – Seen a better rate? We’ll match it.
3% Off All Direct Bookings – Always get the best value, no commissions.
5% Off for Returning Guests – Because we love having you back.
Quick, Contactless Check-In via SMS – Straight to your villa, no delays.
Gallery
Skip past gallery See All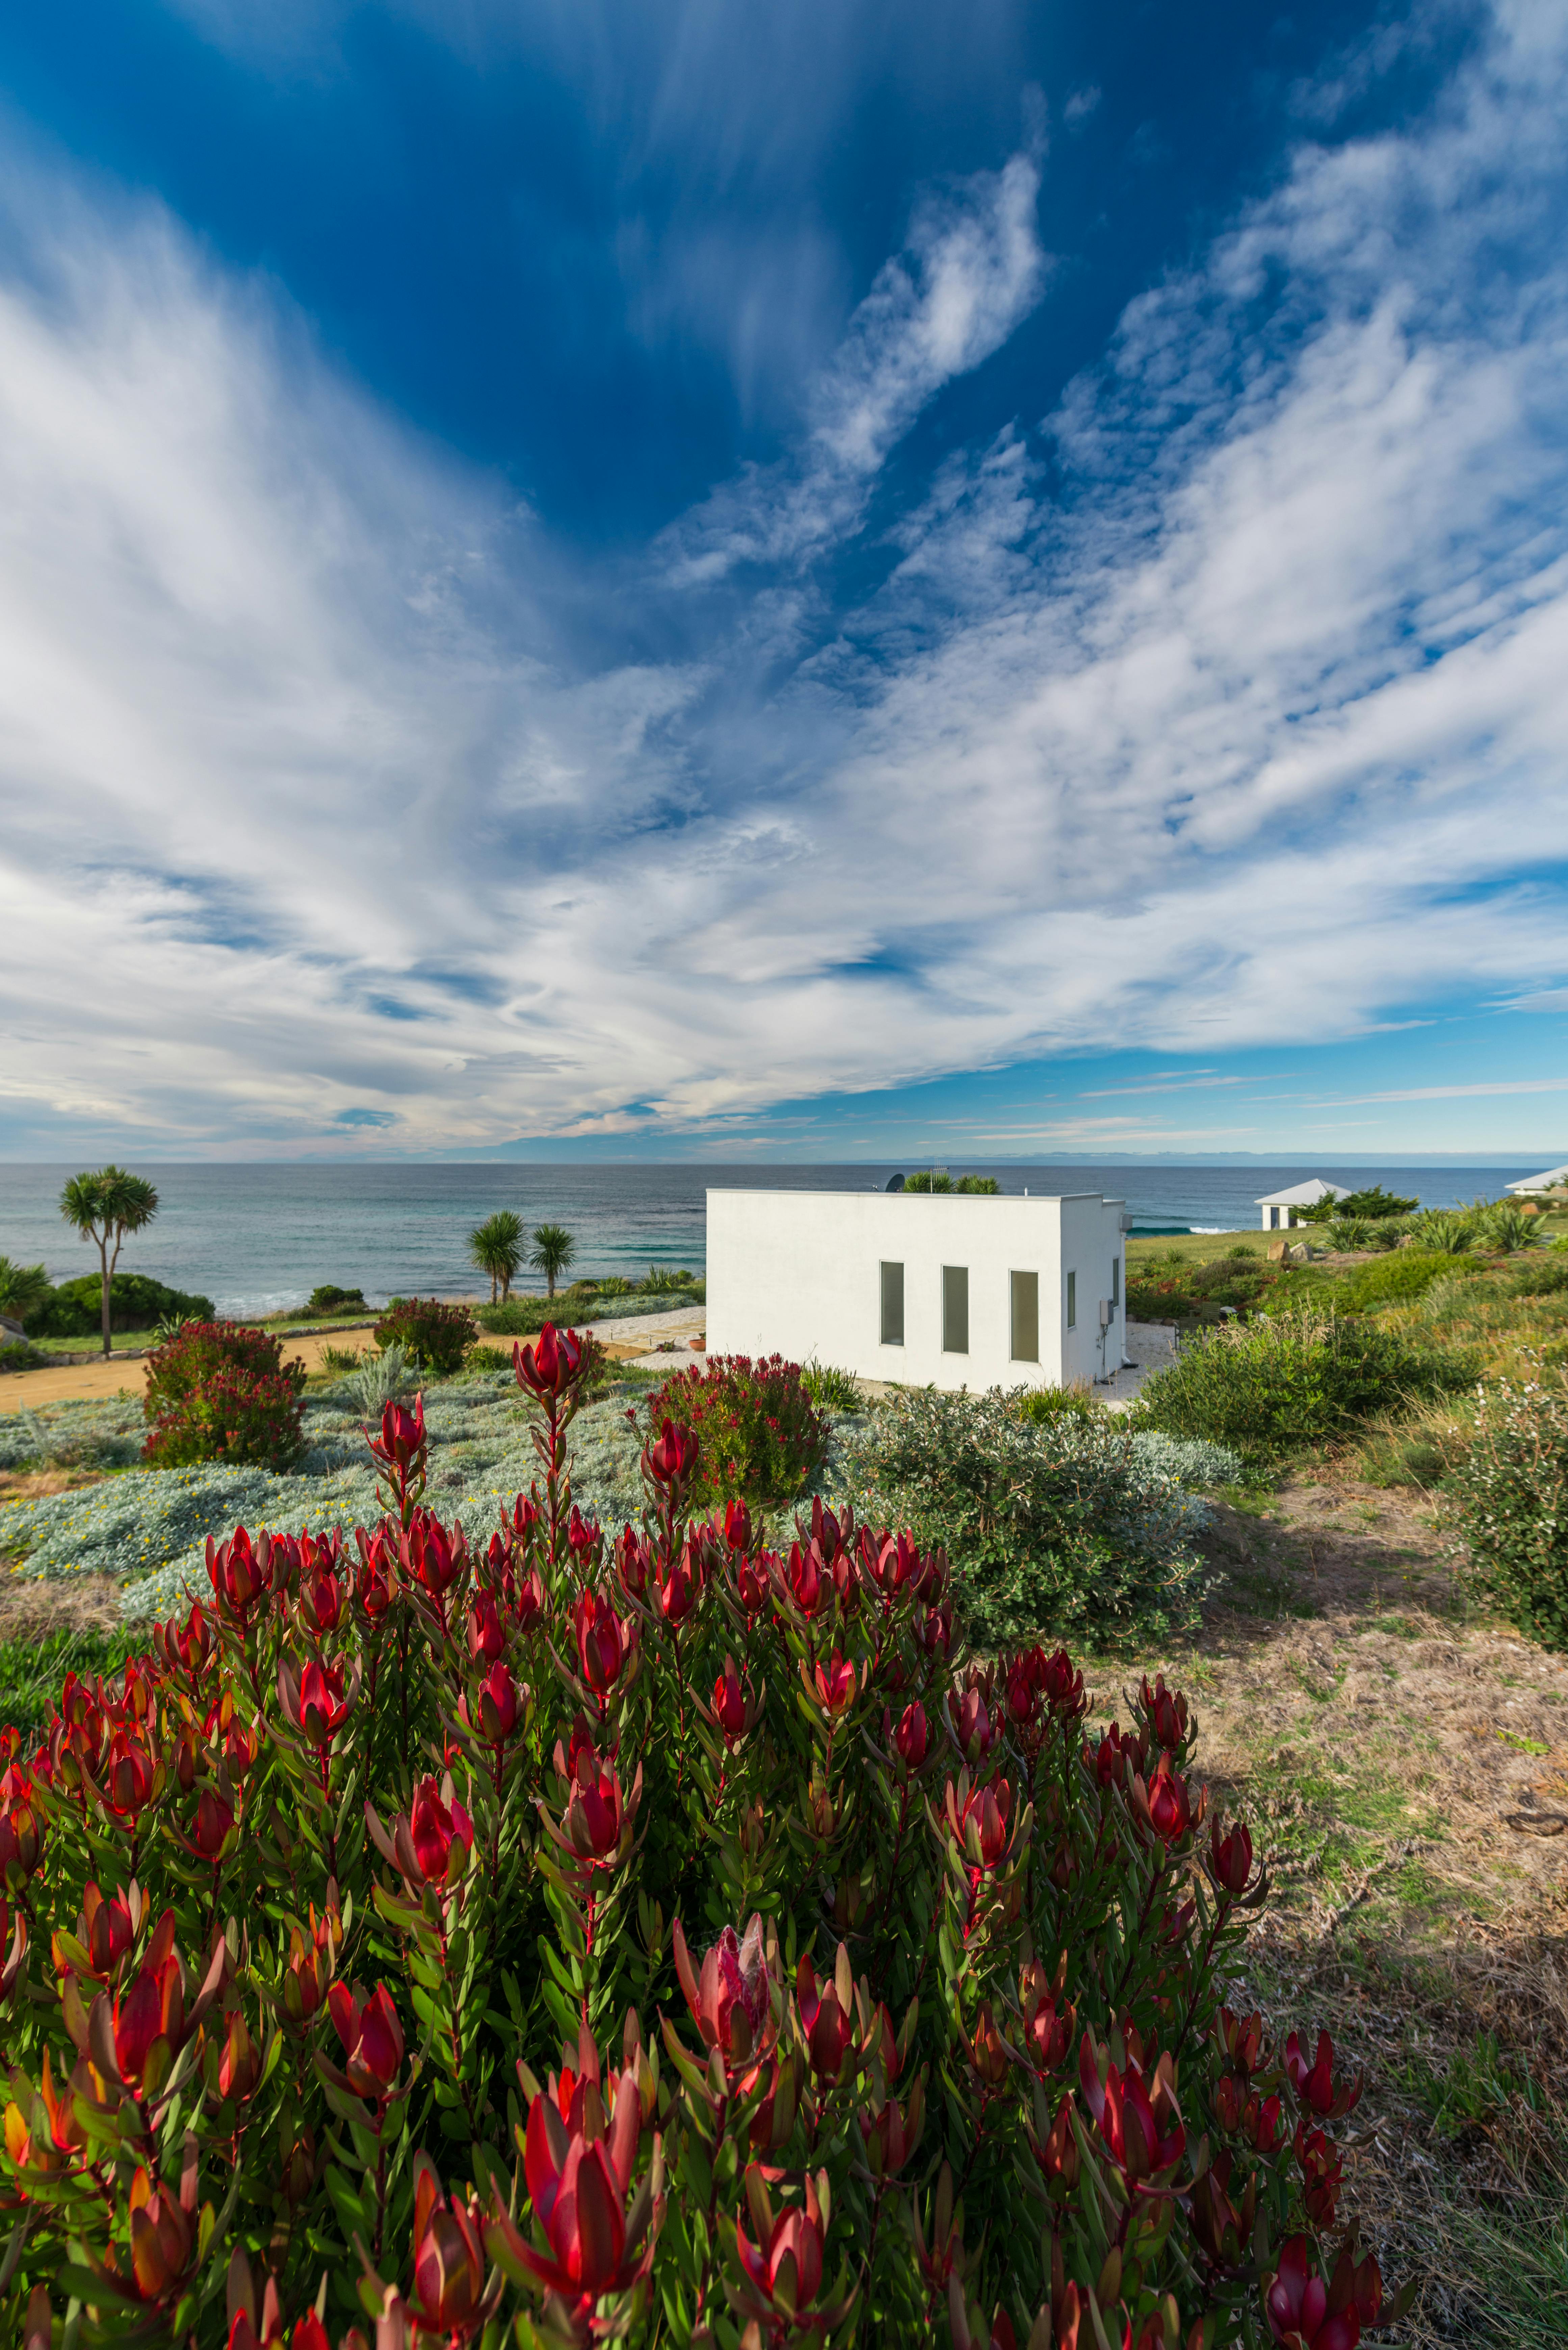


Attractions
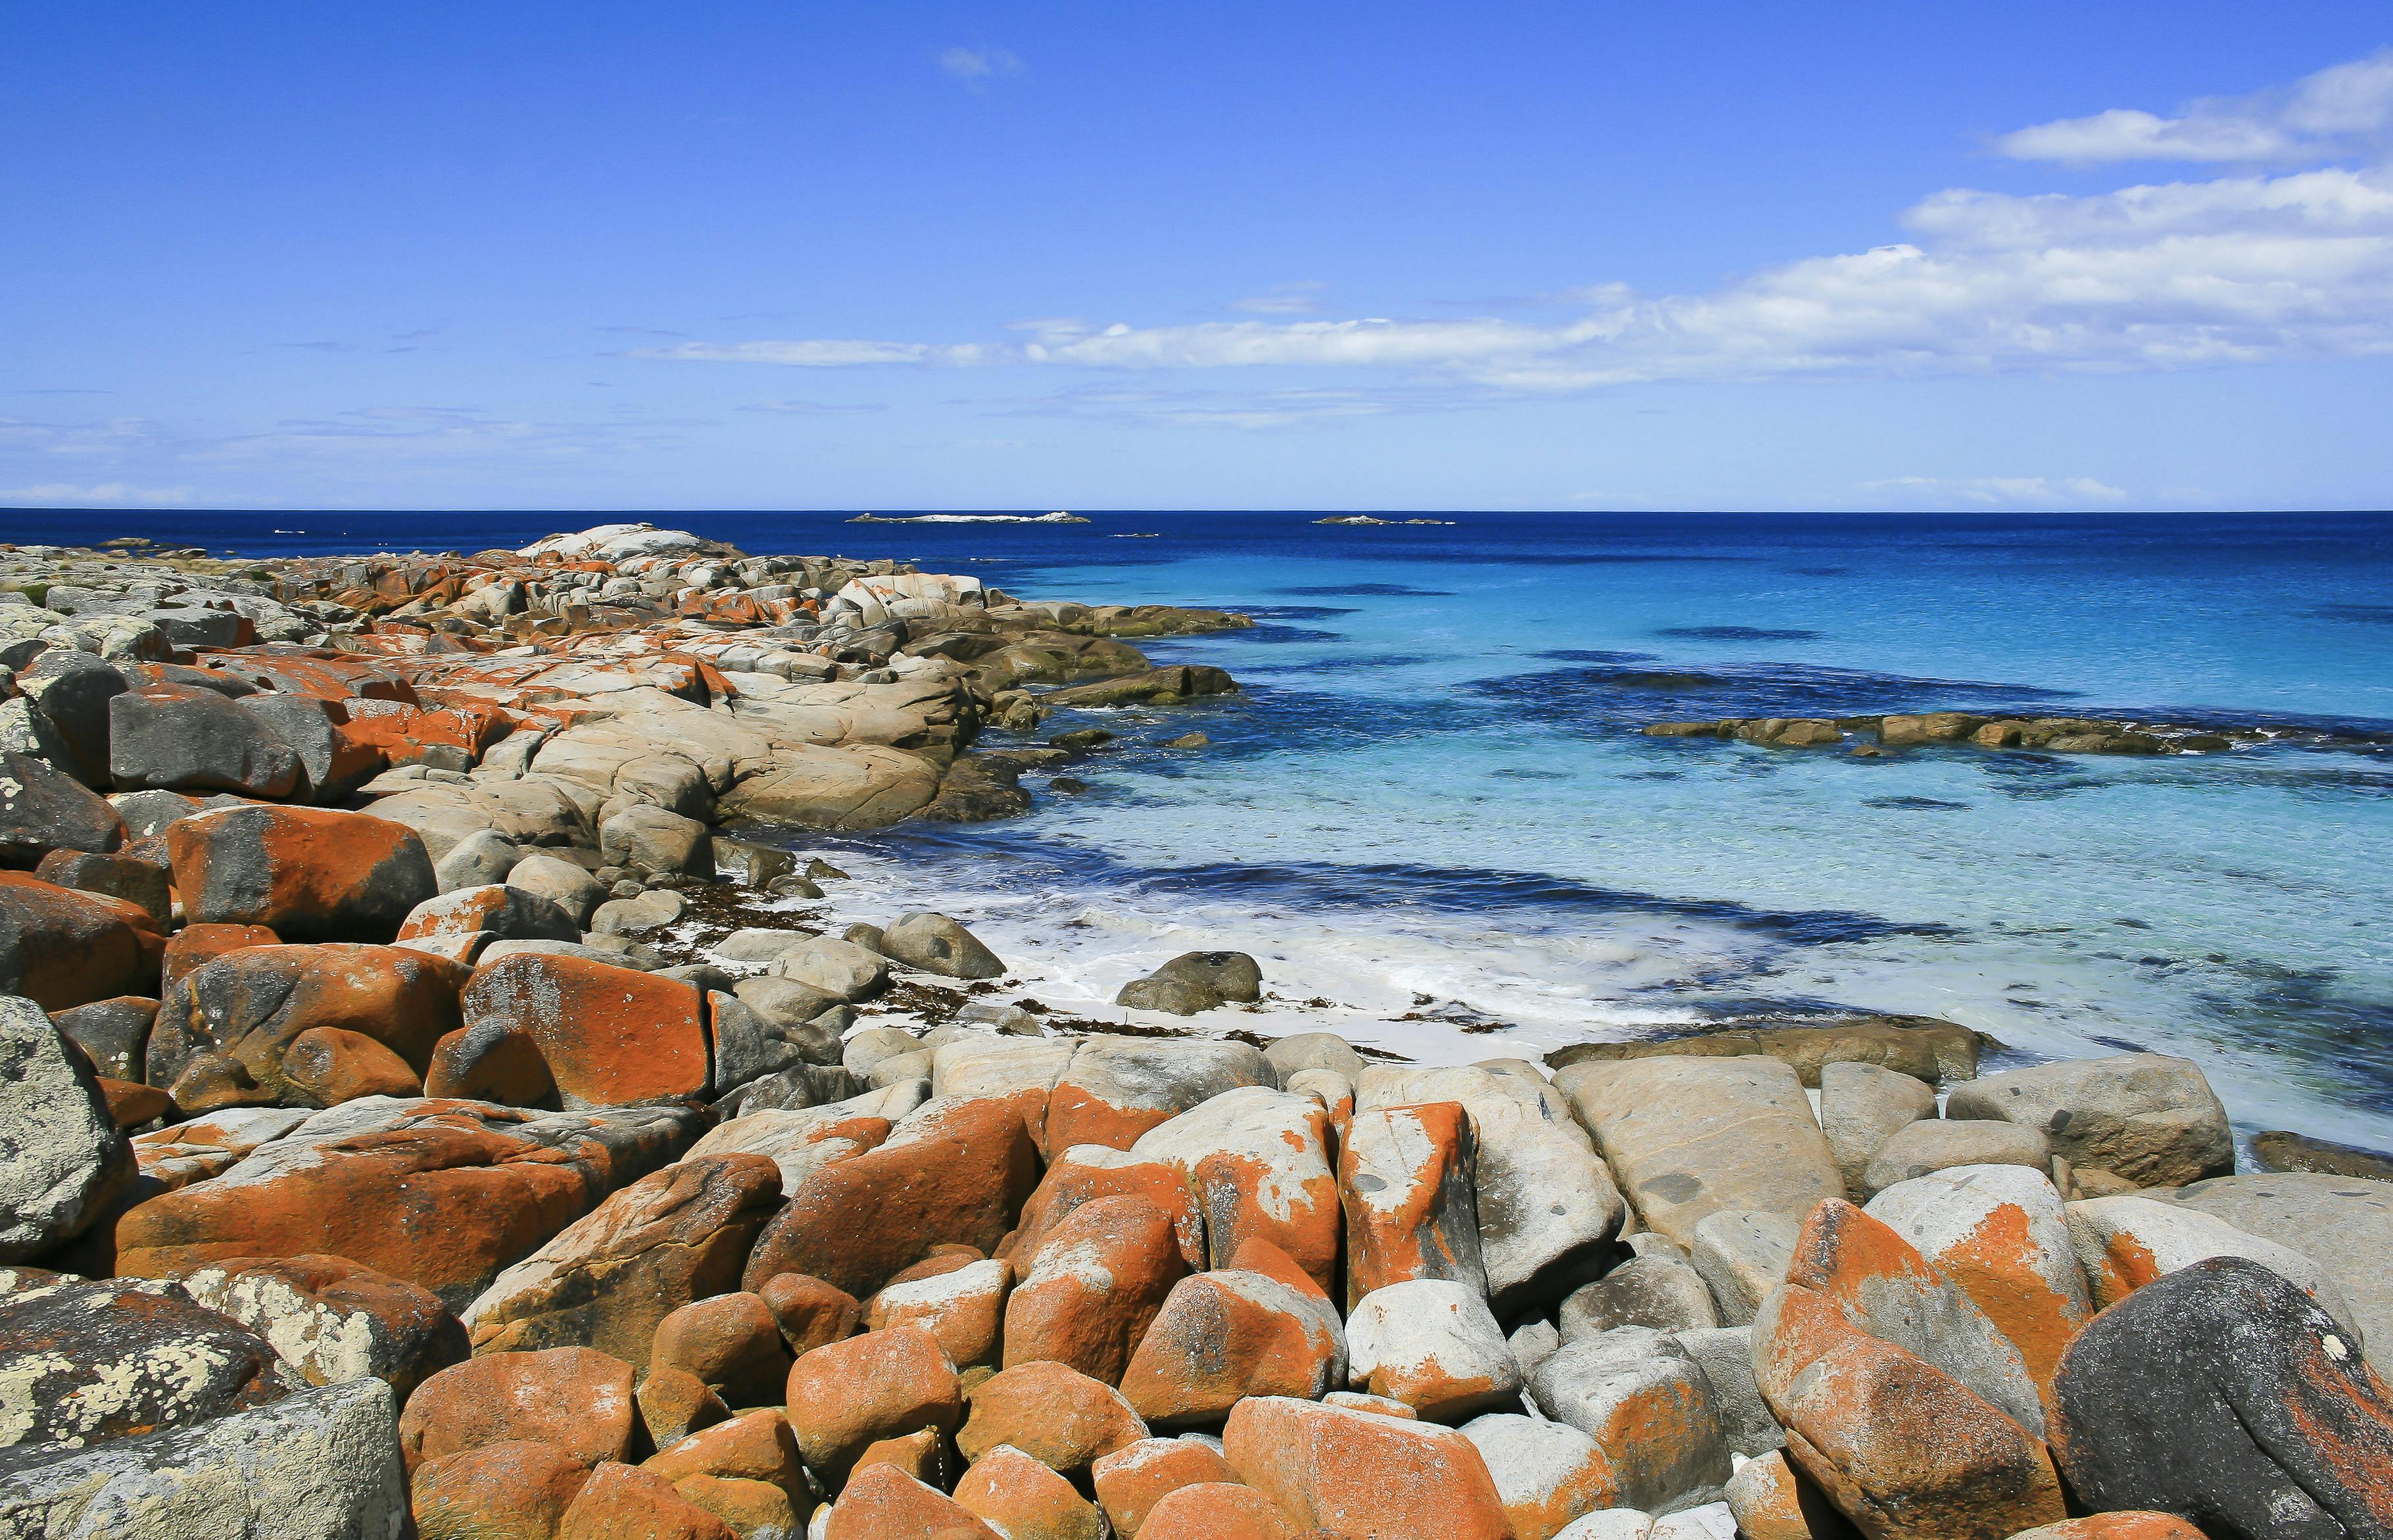
See AllBay Of Fires The Bay of Fires (indigenous name: larapuna) is a bay on the northeastern coast of Tasmania in Australia, extending from Binalong Bay to Eddystone Point. The Bay of Fires is a region of white beaches, blue water and orange-hued granite (the colour of which is actually produced by a lichen). The northern section of the bay is part of Mount William National Park; the southern end is a conservation area.Best day trip:Pyengana Cheese Factory, Pub in the paddock, St. Columba Falls & The Shop in the Bush Normal 0 false false false EN-US JA X-NONE <w:LatentStyles DefLockedState="false" DefUnhideWhenUsed="true" DefSemiHidden="true" DefQFormat="false" DefPriority="99" LatentStyleCount="276"> <w:LsdException Locked="false" Priority="0" SemiHidden="false" UnhideWhenUsed="false" QFormat="true" Name="Normal"/> <w:LsdException Locked="false" Priority="9" SemiHidden="false" UnhideWhenUsed="false" QFormat="true" Name="heading 1"/> <w:LsdException Locked="false" Priority="10" SemiHidden="false" UnhideWhenUsed="false" QFormat="true" Name="Title"/> <w:LsdException Locked="false" Priority="11" SemiHidden="false" UnhideWhenUsed="false" QFormat="true" Name="Subtitle"/> <w:LsdException Locked="false" Priority="22" SemiHidden="false" UnhideWhenUsed="false" QFormat="true" Name="Strong"/> <w:LsdException Locked="false" Priority="20" SemiHidden="false" UnhideWhenUsed="false" QFormat="true" Name="Emphasis"/> <w:LsdException Locked="false" Priority="59" SemiHidden="false" UnhideWhenUsed="false" Name="Table Grid"/> <w:LsdException Locked="false" Priority="1" SemiHidden="false" UnhideWhenUsed="false" QFormat="true" Name="No Spacing"/> <w:LsdException Locked="false" Priority="60" SemiHidden="false" UnhideWhenUsed="false" Name="Light Shading"/> <w:LsdException Locked="false" Priority="61" SemiHidden="false" UnhideWhenUsed="false" Name="Light List"/> <w:LsdException Locked="false" Priority="62" SemiHidden="false" UnhideWhenUsed="false" Name="Light Grid"/> <w:LsdException Locked="false" Priority="63" SemiHidden="false" UnhideWhenUsed="false" Name="Medium Shading 1"/> <w:LsdException Locked="false" Priority="64" SemiHidden="false" UnhideWhenUsed="false" Name="Medium Shading 2"/> <w:LsdException Locked="false" Priority="65" SemiHidden="false" UnhideWhenUsed="false" Name="Medium List 1"/> <w:LsdException Locked="false" Priority="66" SemiHidden="false" UnhideWhenUsed="false" Name="Medium List 2"/> <w:LsdException Locked="false" Priority="67" SemiHidden="false" UnhideWhenUsed="false" Name="Medium Grid 1"/> <w:LsdException Locked="false" Priority="68" SemiHidden="false" UnhideWhenUsed="false" Name="Medium Grid 2"/> <w:LsdException Locked="false" Priority="69" SemiHidden="false" UnhideWhenUsed="false" Name="Medium Grid 3"/> <w:LsdException Locked="false" Priority="70" SemiHidden="false" UnhideWhenUsed="false" Name="Dark List"/> <w:LsdException Locked="false" Priority="71" SemiHidden="false" UnhideWhenUsed="false" Name="Colorful Shading"/> <w:LsdException Locked="false" Priority="72" SemiHidden="false" UnhideWhenUsed="false" Name="Colorful List"/> <w:LsdException Locked="false" Priority="73" SemiHidden="false" UnhideWhenUsed="false" Name="Colorful Grid"/> <w:LsdException Locked="false" Priority="60" SemiHidden="false" UnhideWhenUsed="false" Name="Light Shading Accent 1"/> <w:LsdException Locked="false" Priority="61" SemiHidden="false" UnhideWhenUsed="false" Name="Light List Accent 1"/> <w:LsdException Locked="false" Priority="62" SemiHidden="false" UnhideWhenUsed="false" Name="Light Grid Accent 1"/> <w:LsdException Locked="false" Priority="63" SemiHidden="false" UnhideWhenUsed="false" Name="Medium Shading 1 Accent 1"/> <w:LsdException Locked="false" Priority="64" SemiHidden="false" UnhideWhenUsed="false" Name="Medium Shading 2 Accent 1"/> <w:LsdException Locked="false" Priority="65" SemiHidden="false" UnhideWhenUsed="false" Name="Medium List 1 Accent 1"/> <w:LsdException Locked="false" Priority="34" SemiHidden="false" UnhideWhenUsed="false" QFormat="true" Name="List Paragraph"/> <w:LsdException Locked="false" Priority="29" SemiHidden="false" UnhideWhenUsed="false" QFormat="true" Name="Quote"/> <w:LsdException Locked="false" Priority="30" SemiHidden="false" UnhideWhenUsed="false" QFormat="true" Name="Intense Quote"/> <w:LsdException Locked="false" Priority="66" SemiHidden="false" UnhideWhenUsed="false" Name="Medium List 2 Accent 1"/> <w:LsdException Locked="false" Priority="67" SemiHidden="false" UnhideWhenUsed="false" Name="Medium Grid 1 Accent 1"/> <w:LsdException Locked="false" Priority="68" SemiHidden="false" UnhideWhenUsed="false" Name="Medium Grid 2 Accent 1"/> <w:LsdException Locked="false" Priority="69" SemiHidden="false" UnhideWhenUsed="false" Name="Medium Grid 3 Accent 1"/> <w:LsdException Locked="false" Priority="70" SemiHidden="false" UnhideWhenUsed="false" Name="Dark List Accent 1"/> <w:LsdException Locked="false" Priority="71" SemiHidden="false" UnhideWhenUsed="false" Name="Colorful Shading Accent 1"/> <w:LsdException Locked="false" Priority="72" SemiHidden="false" UnhideWhenUsed="false" Name="Colorful List Accent 1"/> <w:LsdException Locked="false" Priority="73" SemiHidden="false" UnhideWhenUsed="false" Name="Colorful Grid Accent 1"/> <w:LsdException Locked="false" Priority="60" SemiHidden="false" UnhideWhenUsed="false" Name="Light Shading Accent 2"/> <w:LsdException Locked="false" Priority="61" SemiHidden="false" UnhideWhenUsed="false" Name="Light List Accent 2"/> <w:LsdException Locked="false" Priority="62" SemiHidden="false" UnhideWhenUsed="false" Name="Light Grid Accent 2"/> <w:LsdException Locked="false" Priority="63" SemiHidden="false" UnhideWhenUsed="false" Name="Medium Shading 1 Accent 2"/> <w:LsdException Locked="false" Priority="64" SemiHidden="false" UnhideWhenUsed="false" Name="Medium Shading 2 Accent 2"/> <w:LsdException Locked="false" Priority="65" SemiHidden="false" UnhideWhenUsed="false" Name="Medium List 1 Accent 2"/> <w:LsdException Locked="false" Priority="66" SemiHidden="false" UnhideWhenUsed="false" Name="Medium List 2 Accent 2"/> <w:LsdException Locked="false" Priority="67" SemiHidden="false" UnhideWhenUsed="false" Name="Medium Grid 1 Accent 2"/> <w:LsdException Locked="false" Priority="68" SemiHidden="false" UnhideWhenUsed="false" Name="Medium Grid 2 Accent 2"/> <w:LsdException Locked="false" Priority="69" SemiHidden="false" UnhideWhenUsed="false" Name="Medium Grid 3 Accent 2"/> <w:LsdException Locked="false" Priority="70" SemiHidden="false" UnhideWhenUsed="false" Name="Dark List Accent 2"/> <w:LsdException Locked="false" Priority="71" SemiHidden="false" UnhideWhenUsed="false" Name="Colorful Shading Accent 2"/> <w:LsdException Locked="false" Priority="72" SemiHidden="false" UnhideWhenUsed="false" Name="Colorful List Accent 2"/> <w:LsdException Locked="false" Priority="73" SemiHidden="false" UnhideWhenUsed="false" Name="Colorful Grid Accent 2"/> <w:LsdException Locked="false" Priority="60" SemiHidden="false" UnhideWhenUsed="false" Name="Light Shading Accent 3"/> <w:LsdException Locked="false" Priority="61" SemiHidden="false" UnhideWhenUsed="false" Name="Light List Accent 3"/> <w:LsdException Locked="false" Priority="62" SemiHidden="false" UnhideWhenUsed="false" Name="Light Grid Accent 3"/> <w:LsdException Locked="false" Priority="63" SemiHidden="false" UnhideWhenUsed="false" Name="Medium Shading 1 Accent 3"/> <w:LsdException Locked="false" Priority="64" SemiHidden="false" UnhideWhenUsed="false" Name="Medium Shading 2 Accent 3"/> <w:LsdException Locked="false" Priority="65" SemiHidden="false" UnhideWhenUsed="false" Name="Medium List 1 Accent 3"/> <w:LsdException Locked="false" Priority="66" SemiHidden="false" UnhideWhenUsed="false" Name="Medium List 2 Accent 3"/> <w:LsdException Locked="false" Priority="67" SemiHidden="false" UnhideWhenUsed="false" Name="Medium Grid 1 Accent 3"/> <w:LsdException Locked="false" Priority="68" SemiHidden="false" UnhideWhenUsed="false" Name="Medium Grid 2 Accent 3"/> <w:LsdException Locked="false" Priority="69" SemiHidden="false" UnhideWhenUsed="false" Name="Medium Grid 3 Accent 3"/> <w:LsdException Locked="false" Priority="70" SemiHidden="false" UnhideWhenUsed="false" Name="Dark List Accent 3"/> <w:LsdException Locked="false" Priority="71" SemiHidden="false" UnhideWhenUsed="false" Name="Colorful Shading Accent 3"/> <w:LsdException Locked="false" Priority="72" SemiHidden="false" UnhideWhenUsed="false" Name="Colorful List Accent 3"/> <w:LsdException Locked="false" Priority="73" SemiHidden="false" UnhideWhenUsed="false" Name="Colorful Grid Accent 3"/> <w:LsdException Locked="false" Priority="60" SemiHidden="false" UnhideWhenUsed="false" Name="Light Shading Accent 4"/> <w:LsdException Locked="false" Priority="61" SemiHidden="false" UnhideWhenUsed="false" Name="Light List Accent 4"/> <w:LsdException Locked="false" Priority="62" SemiHidden="false" UnhideWhenUsed="false" Name="Light Grid Accent 4"/> <w:LsdException Locked="false" Priority="63" SemiHidden="false" UnhideWhenUsed="false" Name="Medium Shading 1 Accent 4"/> <w:LsdException Locked="false" Priority="64" SemiHidden="false" UnhideWhenUsed="false" Name="Medium Shading 2 Accent 4"/> <w:LsdException Locked="false" Priority="65" SemiHidden="false" UnhideWhenUsed="false" Name="Medium List 1 Accent 4"/> <w:LsdException Locked="false" Priority="66" SemiHidden="false" UnhideWhenUsed="false" Name="Medium List 2 Accent 4"/> <w:LsdException Locked="false" Priority="67" SemiHidden="false" UnhideWhenUsed="false" Name="Medium Grid 1 Accent 4"/> <w:LsdException Locked="false" Priority="68" SemiHidden="false" UnhideWhenUsed="false" Name="Medium Grid 2 Accent 4"/> <w:LsdException Locked="false" Priority="69" SemiHidden="false" UnhideWhenUsed="false" Name="Medium Grid 3 Accent 4"/> <w:LsdException Locked="false" Priority="70" SemiHidden="false" UnhideWhenUsed="false" Name="Dark List Accent 4"/> <w:LsdException Locked="false" Priority="71" SemiHidden="false" UnhideWhenUsed="false" Name="Colorful Shading Accent 4"/> <w:LsdException Locked="false" Priority="72" SemiHidden="false" UnhideWhenUsed="false" Name="Colorful List Accent 4"/> <w:LsdException Locked="false" Priority="73" SemiHidden="false" UnhideWhenUsed="false" Name="Colorful Grid Accent 4"/> <w:LsdException Locked="false" Priority="60" SemiHidden="false" UnhideWhenUsed="false" Name="Light Shading Accent 5"/> <w:LsdException Locked="false" Priority="61" SemiHidden="false" UnhideWhenUsed="false" Name="Light List Accent 5"/> <w:LsdException Locked="false" Priority="62" SemiHidden="false" UnhideWhenUsed="false" Name="Light Grid Accent 5"/> <w:LsdException Locked="false" Priority="63" SemiHidden="false" UnhideWhenUsed="false" Name="Medium Shading 1 Accent 5"/> <w:LsdException Locked="false" Priority="64" SemiHidden="false" UnhideWhenUsed="false" Name="Medium Shading 2 Accent 5"/> <w:LsdException Locked="false" Priority="65" SemiHidden="false" UnhideWhenUsed="false" Name="Medium List 1 Accent 5"/> <w:LsdException Locked="false" Priority="66" SemiHidden="false" UnhideWhenUsed="false" Name="Medium List 2 Accent 5"/> <w:LsdException Locked="false" Priority="67" SemiHidden="false" UnhideWhenUsed="false" Name="Medium Grid 1 Accent 5"/> <w:LsdException Locked="false" Priority="68" SemiHidden="false" UnhideWhenUsed="false" Name="Medium Grid 2 Accent 5"/> <w:LsdException Locked="false" Priority="69" SemiHidden="false" UnhideWhenUsed="false" Name="Medium Grid 3 Accent 5"/> <w:LsdException Locked="false" Priority="70" SemiHidden="false" UnhideWhenUsed="false" Name="Dark List Accent 5"/> <w:LsdException Locked="false" Priority="71" SemiHidden="false" UnhideWhenUsed="false" Name="Colorful Shading Accent 5"/> <w:LsdException Locked="false" Priority="72" SemiHidden="false" UnhideWhenUsed="false" Name="Colorful List Accent 5"/> <w:LsdException Locked="false" Priority="73" SemiHidden="false" UnhideWhenUsed="false" Name="Colorful Grid Accent 5"/> <w:LsdException Locked="false" Priority="60" SemiHidden="false" UnhideWhenUsed="false" Name="Light Shading Accent 6"/> <w:LsdException Locked="false" Priority="61" SemiHidden="false" UnhideWhenUsed="false" Name="Light List Accent 6"/> <w:LsdException Locked="false" Priority="62" SemiHidden="false" UnhideWhenUsed="false" Name="Light Grid Accent 6"/> <w:LsdException Locked="false" Priority="63" SemiHidden="false" UnhideWhenUsed="false" Name="Medium Shading 1 Accent 6"/> <w:LsdException Locked="false" Priority="64" SemiHidden="false" UnhideWhenUsed="false" Name="Medium Shading 2 Accent 6"/> <w:LsdException Locked="false" Priority="65" SemiHidden="false" UnhideWhenUsed="false" Name="Medium List 1 Accent 6"/> <w:LsdException Locked="false" Priority="66" SemiHidden="false" UnhideWhenUsed="false" Name="Medium List 2 Accent 6"/> <w:LsdException Locked="false" Priority="67" SemiHidden="false" UnhideWhenUsed="false" Name="Medium Grid 1 Accent 6"/> <w:LsdException Locked="false" Priority="68" SemiHidden="false" UnhideWhenUsed="false" Name="Medium Grid 2 Accent 6"/> <w:LsdException Locked="false" Priority="69" SemiHidden="false" UnhideWhenUsed="false" Name="Medium Grid 3 Accent 6"/> <w:LsdException Locked="false" Priority="70" SemiHidden="false" UnhideWhenUsed="false" Name="Dark List Accent 6"/> <w:LsdException Locked="false" Priority="71" SemiHidden="false" UnhideWhenUsed="false" Name="Colorful Shading Accent 6"/> <w:LsdException Locked="false" Priority="72" SemiHidden="false" UnhideWhenUsed="false" Name="Colorful List Accent 6"/> <w:LsdException Locked="false" Priority="73" SemiHidden="false" UnhideWhenUsed="false" Name="Colorful Grid Accent 6"/> <w:LsdException Locked="false" Priority="19" SemiHidden="false" UnhideWhenUsed="false" QFormat="true" Name="Subtle Emphasis"/> <w:LsdException Locked="false" Priority="21" SemiHidden="false" UnhideWhenUsed="false" QFormat="true" Name="Intense Emphasis"/> <w:LsdException Locked="false" Priority="31" SemiHidden="false" UnhideWhenUsed="false" QFormat="true" Name="Subtle Reference"/> <w:LsdException Locked="false" Priority="32" SemiHidden="false" UnhideWhenUsed="false" QFormat="true" Name="Intense Reference"/> <w:LsdException Locked="false" Priority="33" SemiHidden="false" UnhideWhenUsed="false" QFormat="true" Name="Book Title"/> /* Style Definitions */ table.MsoNormalTable {mso-style-name:"Table Normal"; mso-tstyle-rowband-size:0; mso-tstyle-colband-size:0; mso-style-noshow:yes; mso-style-priority:99; mso-style-parent:""; mso-padding-alt:0cm 5.4pt 0cm 5.4pt; mso-para-margin:0cm; mso-para-margin-bottom:.0001pt; mso-pagination:widow-orphan; font-size:12.0pt; font-family:Cambria; mso-ascii-font-family:Cambria; mso-ascii-theme-font:minor-latin; mso-hansi-font-family:Cambria; mso-hansi-theme-font:minor-latin; mso-ansi-language:EN-US;} Pyengana Cheese Factory / The Pub in the Paddock / St Columba Falls 20 minutes drive north of St Helens are the dairy plains of Pyengana and the home of ‘the trifecta’ ….1) The Holy Cow Café and Cheese Factory, 2) The Pub in the Paddock and 3) St Columba Falls...& 4.) The Shop in the BushThe Holy Cow Café is great stopover, it’s part of the cheese factory and open everyday for coffee/snacks/lunches. Outside there are tables and chairs to eat and take in the views over the dairy country, on a sunny day stunning.,.. in fact any day it is! They also offer cheese tastings - their artisan cheeses are much lauded and worth the asking price! Try the handmade Tasmanian flavoured ice-creams. The cafe is open 7 days a week from 9am–5pm (10am–4pm during Winter). http://pyenganadairy.com.au/cafe/400mtrs from the cheese factory is the famous Pub in the Paddock, step back in time for old school counter meals. Buy a stubbie, take it out to the pig-sty next to the car park, and give it to the resident beer swilling pig (she prefers Boags Draught!) and has been of drinking age for over 15 years, she’ll drink all-comers ‘under the fence!’ http://www.pubinthepaddock.com.au/homeSt Columba Falls is 5km further on and really is a worthwhile walk - an easy 600m walk to the waterfall through a really nice snapshot of Tasmanian rainforest – taste the purest of pure water from the stream on the way in..….infinitely better than the bought stuff!Also, halfway between St Helens and Pyengana is The Shop In The Bush, a worthwhile stop to peruse an array of quality collectables, specializing in aged books, old jewellery and quality glassware - and have a warm by their open log fire ….if you ever desire an open fire in your life, this is the one you want!Beaches Unspoiled beaches, there are many. Falmouth Beach and Lagoon is great at low tide - Scamander Beach is huge and easy to access - Four Mile Creek Beach perhaps the pick for a 3km beach walk. Further south Little Beach and Chain of Lagoons Beach areClimbing St. Patrick's Head lookout Spectacular views await the adventurous hiker - an hour long walk with the last 10 minutes a rocky scramble to the top. The 360 degree views are breathtaking - to the north The Bay of Fires and Eddystone Lighthouse - south the vista extends to the Freycinet Peninsula and Maria Island.Short Walk to South Sister's Lookout A 10 minute drive from St Marys is a short 10 minute walk up to the South Sisters Lookout - used as a Forestry Fire Observation Lookout in the Summer months the views extend west along the Fingal Valley and the wide expanses east to the coast. A popular and easy vantage point for visitors to see a birdseye snapshot of the mid-East Coast.Short Bush walk through the Winifried Curtis Reserve A short walk (1hr) amongst coastal shrub vegetation - see native orchids and birdlife that are endemic to the Scamander area. A pleasant little bush walk that is easy and enlightening.Pure Air - Pristine Environment Why Tasmania?Tasmania's greatest asset is the very fact that it is an island at latitude 42Degrees South - look west and the next land feature is the east coast of Argentina - look south and it's Antartica. The cleanest air and purest rainwater in the world; rivers and streams that originate from pristine mountain ranges and filter through ancient rainforests and highland peat marshes into the cool Southern Ocean. Tasmania's maritime environment with its four coastlines are unique as they are diverse, teeming with a rich array of endemic cold water sealife, they set the island apart from mainland Australia. With only 500,000 inhabitants Tasmania is, and will always remain, an unspoilt jewel at the bottom of the world.East Coast Tasmania Attractions EAST COAST ADVENTURES & WineriesFREYCINET AIR - Scenic flights www.freycinetair.com.auFREYCINET ADVENTURES - Sea Kayaking tourswww.freycinetadventures.com.auALL 4 ADVENTURE - Quad bike tourswww.all4adventure.com.auNATURE WORLD - Wildlife park www.natureworld.com.auCOASTAL STYLE - Fashion and Homewares, 69 Burgess St, BichenoSPRING VALE - Vineyard, Cranbrook www.springvalewines.comMILTON - Vineyard, Cranbrook www.miltonvineyard.com.auGALA ESTATE - Vineyard, Cranbrook www.galaestate.com.auDEVILS CORNER - Vineyard, Apslawn www.brownbrothers.com.auPONDERING FROG - Icecreamery www.ponderingfrog.com.auFREYCINET MARINE FARM - Fresh cooked Seafood www.freycinetmarinefarm.comBicheno Penguin Tours Bicheno Penguin ToursWhenOperates 7 days a week except for Good Friday, Christmas Day and New Year’s Eve. Tours begin at dusk. See the Seasonal Calendar page for expected penguin numbers.WhereOur office is centrally located in Bicheno on the main road. Tours are conducted on private property and cannot be accessed by the public.WhatYou can expect to get very close to a penguin. Wear very warm clothing in winter and covered footwear – Penguins bite toes! Strictly no cameras permitted on tourWhyA penguin tour is the best way to see penguins up close and safely without disturbing them, or hurting yourself! The penguins are accustomed to our tour and lights, but loud noises and camera flashes will scare them away.HowTo book by phone or fax you will need a credit card, or, use a travel agent or Tasmania Visitor Information Centre. Alternatively, you can submit and online booking requesthttps://www.bichenopenguintours.com.auLease 65 Oyster Farm Fresh Oyster FarmNature World Wildlife East Coast Natureworld sits amongst 150 acres of natural parkland and lagoons. The perfect place to experience Tasmania's unique animals, birds, reptilesThe extensive park grounds allow you to wander around at your own leisure. Wheel chair & pram friendly paths allow all to experience the uniqueness of Tasmania up close.There is food and drink served for most of the day in the Gallery Cafe. For the wildlife photography enthusiast there is an extensive display of Tasmanian wildlife photography.The shop has a wide range of souvenirs with a Tasmanian wildlife theme.Your experience begins as you are greeted by two very chatty Sulphur Crested Cockatoos and an amazing view of the lagoon.http://natureworld.com.au/contact.htmlMount William National Park Mount William National Park is a pristine paradise tucked away on the far North-East Coast of Tasmania, at the northern end of the Bay of Fires. This windswept coastline features rocky outcrops marked with bright orange lichen and seemingly endless stretches of powder-white sand that squeaks beneath your feet – all set against a backdrop of crystal-clear turquoise water.Mount William National Park is peaceful and relaxed, perfect for walking, fishing, swimming or kicking back at your beachside campsite doing nothing at all.The Park’s namesake, wukalina/Mount William, sits at 216m above sea level. From the summit, enjoy panoramic views of the coast and, on a clear day, all the way to the Furneaux Islands in Bass Strait.Mount William National Park is home to an abundance of Tasmania’s marsupials and, as you explore, you can spot kangaroos, wombats, wallabies and echidnas. The coastal birdlife is just as varied, with over 100 species, ranging from tiny honeyeaters, wrens and robins, to terns, gannets, albatrosses and oystercatchers.Forester kangaroos are prolific, as are Pademelons and Bennetts wallabies, all of which are best spotted at dawn or sunset. Echidnas, on the other hand, can often be seen ambling about during the day, while Tasmanian devils scavenge here at night. In spring and summer the heathlands abound in wildflowers, and the park is visited by approximately 100 species of birds.This is one of the best places to snorkel in a State renowned for the excellent visibility of its temperate waters. Swimming and boating are also popular, though you should take care - the tides are strong and reefs just below the surface can be a hazard. Scuba-diving is best undertaken with a guide, as good sites are some distance from the shores of the park.The Eddystone Point Lighthouse was built at the southern end of the park in 1889. This impressive and well-preserved structure is popular with visitors, though no tours of its interior are available.Short and Long Walks in Mount William National ParkShort strolls and long beach walks are magical, and the summit of Mount William itself is an easy 90-minute return walk. You must carry your own drinking water wherever you go in the park.On some walks you will find evidence of Aboriginal occupation in the form of large middens created by the discarded shells from long-ago meals of seafood. These are precious places that must be respected and protected by all visitors to the park.Swimming and boating are also popular, though you should take care - the tides are strong and reefs just below the surface can be a hazard. Scuba-diving is best undertaken with a guide, as good sites are some distance from the shores of the park.Wine tour Taste food and wine that has put Tasmania on the map.Long Lunch Tour Co specialises in wine and food tours on the East Coast of Tasmania. With extensive knowledge, fantastic cellar doors and scenery you can sit back and relax.https://www.longlunchtourco.com.auSnorkeling The coastal waters are perfect for exploring with a snorkel or scuba equipment. Dive below to admire some of the colourful marine habitats off Georges Rocks and Eddystone Point, before finding your own private spot to unwind on the beach. To try your hand at fishing, head to Ansons Bay or Musselroe Bay and see if you can catch your dinner.Cinema Nestled on Tasmania's breathtaking North-East Coast, Easy Tiger Cinema at St Helens offers an unrivaled cinematic experience that is a cut above the rest. This new boutique 48-seat cinema boasts an atmosphere of luxury and sophistication. With state-of-the-art projection and sound system, it is one of the most sought-after destinations for movie-goers across Australia. Whether you're a fan of the latest Hollywood blockbusters, arthouse flicks, old classics or adventure films, you'll find a wide range of cinematic delights at Easy Tiger Cinema.Wineglass Bay Cruise Wineglass Bay Cruises is a 4½ hour cruise of the waterways surrounding Freycinet National Park from Coles Bay to Wineglass Bay on Tasmania's East Coast.Cruise the spectacular coastline of Freycinet National Park from Coles Bay to Wineglass Bay. Be enthralled by the stunning granite coastline, including the dramatic pink peaks of the Hazards range.Discover a coast dotted with sparkling white sand beaches, including Cooks and Bryans beaches, only accessible by water or a full day bushwalk. Explore the inner passage of remote Schouten Island, home to little penguins and short tailed shearwaters, before heading into the Tasman Sea towards Wineglass Bay. Look out for various hidden sea caves, blowholes and waterfalls amongst the sheer granite cliffs.Take in the sheer beauty of Wineglass Bay from the rarely seen perspective of the water, a shimmering crescent of white sand fringes spilling into glass turquoise waters. Uncover the rich history of the region, including aboriginal heritage and tales of early explorers and entrepreneurs.https://www.wineglassbaycruises.com.auGo for a massage or beauty treatment Relax ... You Deserve It!Relax... you deserve it! Located In St Helens on the beautiful East Coast of Tasmania, this is your personal spa to pamper, maintain, indulge and Relax. Our goal is to provide a friendly, personalised service through a team of highly skilled and creative professionals. Teamwork is our most valuable asset which ensures our clients are always number one, and we strive to exceed your expectations. Whether your focus is serious results, purely aesthetic or simply pleasure, take time to Relax... you deserve it!https://relaxyoudeserveit1.gettimely.comMountain Bike Trails The St Helens Mountain Bike Trails are located in two unique locations; You will find a series of stacked loops just south of the St Helens Township as well as an epic 42km wilderness trail that starts at the top of the Blue Tier and winds and wends all the way to Swimcart beach found in the internationally acclaimed Bay of Fires. That makes plenty of quality built trails for you and your family to enjoy! Whether you like to shred some serious downhill, enjoy some cross-country flow or just want a fun day on the trails with the family, the St Helens Mountain Bike Trails have an experience for everyone. Not only that, but St Helens is the largest town on Tasmania’s east coast and as such offers plenty for you to see and do while you are taking a break from the trails.https://www.sthelensmtbtrails.com.auReptile Park A World-Class indoor reptile exhibit, based just out of St Helens displaying exotic captive-bred pythons set in a quality museum setting. A keeper presentation and reptile interaction occur daily at midday. Outdoor cafe serving coffee, light snacks, and lunch. Accessible facilities provided. Presenting a unique hands-on visitor experience into herpetology with keeper-assisted handling. Interactive educational billboards stimulate the imagination into the mysteries of the natural world, conservation ideals, mythology, sustainability and reptile husbandry.The park features juvenile reptiles housed within extra-large feature sized enclosures to grow up into the Serpentarium family. Displaying hidden wonders of the world with natural gem displays, treasures, cultural, indigenous artefacts and custom presentations. The highlight offer of the Serpentarium is the hands-on visitor experience, provided through displaying educational billboards, offering keeper presentations and keeper-assisted handling. The Serpentarium shares a small library on the natural world and reptile husbandry, a microscope research station desk, and an outdoor rope climb play area for young adventurers. Enjoy a coffee, light snack or lunch at Rios Cafe, seated under the veranda alongside Rio, our Blue & Gold Macaw, while overlooking an open bush pasture, with accessible facilities. Located at 5 West St, St Helens Tasmania, only five minutes drive from St Helens CBD. Gift sales available offering unique jewelry, natural stone and other memorabilia.https://www.discovertasmania.com.au/things-to-do/nature-and-wildlife/serpentariumwildlifepark/Secret River Tours Kayak ToursTour approximately 4 hoursOne on One Tour $250$150 p/ad two or more people$70 per kiddie/ 17 & u (Max 6 p) Book by txt or emailTxt :0435 914 869mark.srtours@gmail.com


